作为开发者,测试方都需要经常对HTTP请求做分析,现在burpsuit,fiddler也为主流.可是一些场合并不需要如此全面的工具去支撑,快捷便于拓展可能又成为人们的另一个追求点.
0x01 介绍
An interactive console program that allows traffic flows to be intercepted, inspected, modified and replayed.
简单说该工具正如其名MITM(man-in-the-middle)再加个proxy –中间人代理软件,可以用来拦截,修改,保存HTTP/HTTPS请求。当然主要以命令行形式呈现,虽然现在已经有mitmweb辅助出现,不过官网称其暂时为beta阶段,一部分功能暂未完善。
官网地址:https://mitmproxy.org
继续阅读 Mitmproxy使用教程for mac
很久没写博客了,不过其实知道这个blog的人并不多,相对来说我还是比较喜欢自娱自乐,清静点好
最近学习也很忙,自己现在也还差很多,还要继续努力
最近把博客优化了下,访问速度提高了少许,作为一个处女座也看的比较舒服
一些文章里有wooyun上的图片现在也看不了了,有时间处理下
好了,晚安

前言
为什么突然会写这个东西233呢,前段时间微博转发抽奖抽中了本书《Erlang趣学指南》今天刚收到(这是我第一次抽中书呀hha),翻了翻感觉开启了另一个新世界的大门。学习不同的编程语言其实给人感觉是一件有意思的事,重点不在于不同的语法和符号,而是一种学习不同思考方式的过程。现在学习编程语言个人感觉越来越成为一种预测未来发展趋势的行为,大部分人都会选择现在热门的语言,当然同时也有许多新型or非热门语言逐渐开始兴起,值得高兴的事Erlang正是一门优秀的面向并发的编程语言,虽然小众不易维护。当然它独特的概念与其他语言非常不同,语法也看起来比较奇怪,不过这也是他本身特性所需。从某种意义上来说Erlang不只是一门编程语言,更是一个系统平台。
so,我今天也就大致看了看前几页,所以下面就大致介绍一下我初次了解的Erlang
介绍
Erlang是一种通用的面向并发的编程语言,使用Erlang来编写分布式应用要简单的多,因为它的分布式机制是透明的:对于程序来说并不知道自己是在分布式运行。Erlang运行时环境是一个虚拟机,有点像Java虚拟机,这样代码一经编译,同样可以随处运行。它的运行时系统甚至允许代码在不被中断 的情况下更新。另外如果需要更高效的话,字节代码也可以编译成本地代码运行。
特点
● 并发性 – Erlang支持超大量级的并发进程,并且不需要操作系统具有并发机制。
● 分布式 – 一个分布式Erlang系统是多个Erlang节点组成的网络(通常每个处理器被作为一个节点)
● 健壮性 – Erlang具有多种基本的错误检测能力,它们能够用于构建容错系统。
● 软实时性- Erlang支持可编程的“软”实时系统,使用了递增式垃圾收集技术。
● 热代码升级-Erlang允许程序代码在运行系统中被修改。旧代码能被逐步淘汰而后被新代码替换。在此过渡期间,新旧代码是共存的。
●递增式代码装载-用户能够控制代码如何被装载的细节。
●外部接口-Erlang进程与外部世界之间的通讯使用和在Erlang进程之间相同的消息传送机制。
●Fail-fast(中文译为速错),即尽可能快的暴露程序中的错误。
●面向并发的编程(COP concurrency-oriented programming)
●函数式编程
●动态类型
●及早求值或严格求值
●脚本语言
优缺点
“Erlang 是动态类型的语言,因而不能进行静态分析,所生成的文档也不包含有助于理解的类型信息”——这是惯常的看法,广为流行,而且被看作是 Erlang 在开发大型系统时的一个短板(大型系统意味着更强烈的静态分析需求和更严重的依赖文档进行沟通)。
然而 Erlang 是一个有着 20 多年历史的成熟系统,它早已发展出了一套自己的类型标注系统,不仅用来生成文档,更重要的是可以据此对源码进行静态分析,通过程序来排除一些低级的和隐藏的错误。在这方面, Erlang OTP 的源码本身及其文档就是最好的例子。在 《Erlang 程序设计》的附录A部分,对于这个系统的使用已经进行了充分的说明。
Erlang
- 最简洁精练的分布式模型
- Node, Process, Mail (Message)
- 最优雅的错误处理模型:速错(Fail fast)
- 如果出现任何异常,立即死掉
- GenServer编程框架
- 程序代码风格完全一致,便于交流
- 轻量级的进程
- 可以尽可能地按照正常的业务逻辑去设计,而不是过多地考虑硬件环境的制约。
- 更容易写出可靠的程序。也利于事务性代码的编写。
- 当然这是一把双刃剑。它也改变了你的编程习惯。
(参考:http://www.cnblogs.com/dasea/archive/2012/08/18/2644927.html)
多了解一些东西没什么坏处,不是吗:)
所以要等,所以要忍,一直要到春天过去,到灿烂平息,到雷霆把他们轻轻放过,到幸福不请自来,才笃定,才坦然,才能在街头淡淡一笑。春有春的好,春天过去,有过去的好。
——《我们的她们》
最近准备装东西需要用到docker,由于电脑win8所以到官方看了看文档安装下,最后发现给的装下的似乎没带python,导致程序运行不动…比较坑了,最近快开学了不搞了233,以后有时间再翻翻官方文档吧233
Windows users use Docker Toolbox to install Docker software. Docker Toolbox includes the following Docker tools:
- Docker CLI client for running Docker Engine to create images and containers
- Docker Machine so you can run Docker Engine commands from Windows terminals
- Docker Compose for running the
docker-compose command
- Kitematic, the Docker GUI
- the Docker QuickStart shell preconfigured for a Docker command-line environment
- Oracle VM VirtualBox
Because the Docker Engine daemon uses Linux-specific kernel features, you can’t run Docker Engine natively in Windows. Instead, you must use the Docker Machine command, docker-machine, to create and attach to a small Linux VM on your machine. This VM hosts Docker Engine for you on your Windows system.
Step 1: Check your version
To run Docker, your machine must have a 64-bit operating system running Windows 7 or higher. Additionally, you must make sure that virtualization is enabled on your machine. To verify your machine meets these requirements, do the following:
- Right click the windows message and choose System.
If you aren’t using a supported version, you could consider upgrading your operating system.
If you have a newer system, specifically 64bit Windows 10 Pro, with Enterprise and Education (1511 November update, Build 10586 or later), consider using Docker for Windows instead. It runs natively on the Windows, so there is no need for a pre-configured Docker QuickStart shell. It also uses Hyper-V for virtualization, so the instructions below for checking virtualization will be out of date for newer Windows systems. Full install prerequisites are provided in the Docker for Windows topic in What to know before you install.
- Make sure your Windows system supports Hardware Virtualization Technology and that virtualization is enabled.
For Windows 8 or 8.1
Choose Start > Task Manager and navigate to the Performance tab. Under CPU you should see the following:

If virtualization is not enabled on your system, follow the manufacturer’s instructions for enabling it.
For Windows 7
Run the Microsoft® Hardware-Assisted Virtualization Detection Tool and follow the on-screen instructions.
- Verify your Windows OS is 64-bit (x64)
How you do this verification depends on your Windows version. For details, see the Windows article How to determine whether a computer is running a 32-bit version or 64-bit version of the Windows operating system.
In this section, you install the Docker Toolbox software and several “helper” applications. The installation adds the following software to your machine:
- Docker Client for Windows
- Docker Toolbox management tool and ISO
- Oracle VM VirtualBox
- Git MSYS-git UNIX tools
If you have a previous version of VirtualBox installed, do not reinstall it with the Docker Toolbox installer. When prompted, uncheck it.
If you have Virtual Box running, you must shut it down before running the installer.
- Go to the Docker Toolbox page.
- Click the installer link to download.
- Install Docker Toolbox by double-clicking the installer.
The installer launches the “Setup – Docker Toolbox” dialog.
If Windows security dialog prompts you to allow the program to make a change, choose Yes. The system displays the Setup – Docker Toolbox for Windowswizard.

- Press Next to accept all the defaults and then Install.
Accept all the installer defaults. The installer takes a few minutes to install all the components:
- When notified by Windows Security the installer will make changes, make sure you allow the installer to make the necessary changes.
When it completes, the installer reports it was successful:

- Uncheck “View Shortcuts in File Explorer” and press Finish.
Step 3: Verify your installation
The installer places Docker Toolbox and VirtualBox in your Applications folder. In this step, you start Docker Toolbox and run a simple Docker command.
- On your Desktop, find the Docker Toolbox icon.

- Click the icon to launch a Docker Toolbox terminal.
If the system displays a User Account Control prompt to allow VirtualBox to make changes to your computer. Choose Yes.
The terminal does several things to set up Docker Toolbox for you. When it is done, the terminal displays the $ prompt.

The terminal runs a special bash environment instead of the standard Windows command prompt. The bash environment is required by Docker.
- Make the terminal active by click your mouse next to the
$ prompt.
If you aren’t familiar with a terminal window, here are some quick tips.

The prompt is traditionally a $ dollar sign. You type commands into the command line which is the area after the prompt. Your cursor is indicated by a highlighted area or a | that appears in the command line. After typing a command, always press RETURN.
- Type the
docker run hello-world command and press RETURN.
The command does some work for you, if everything runs well, the command’s output looks like this:
$ docker run hello-world
Unable to find image 'hello-world:latest' locally
Pulling repository hello-world
91c95931e552: Download complete
a8219747be10: Download complete
Status: Downloaded newer image for hello-world:latest
Hello from Docker.
This message shows that your installation appears to be working correctly.
To generate this message, Docker took the following steps:
1. The Docker Engine CLI client contacted the Docker Engine daemon.
2. The Docker Engine daemon pulled the "hello-world" image from the Docker Hub.
(Assuming it was not already locally available.)
3. The Docker Engine daemon created a new container from that image which runs the
executable that produces the output you are currently reading.
4. The Docker Engine daemon streamed that output to the Docker Engine CLI client, which sent it
to your terminal.
To try something more ambitious, you can run an Ubuntu container with:
$ docker run -it ubuntu bash
For more examples and ideas, visit:
https:
原文:https://docs.docker.com/toolbox/toolbox_install_windows/
PE文件的全称是Portable Executable,意为可移植的可执行的文件,常见的EXE、DLL、OCX、SYS、COM都是PE文件,PE文件是微软Windows操作系统上的程序文件(可能是间接被执行,如DLL)
一个可执行文件不光包括二进制的机器代码,还有许多其他信息如字串符,字体,图标等。PE文件格式规定了所有这些信息在可执行文件中如何组织。
PE文件格式把可执行文件分成若干个数据节,不同资源放在不同节中。
一个典型的pe文件中包含的节如下:
.text 由编译器产生,存放二进制的机器代码,也是我们反汇编和调试的对象
.data 初始化的数据块,如宏定义、全局变量、静态变量等
.idata 可执行文件所使用的动态链接库等外来函数与文件的信息
.rsrc 存放程序的资源,如图标、菜单等
(参考:《0day:软件漏洞分析技术》)
PE文件的结构一般如下图

- DOS头是用来兼容MS-DOS操作系统的,目的是当这个文件在MS-DOS上运行时提示一段文字,大部分情况下是:This program cannot be run in DOS mode.还有一个目的,就是指明NT头在文件中的位置。
- NT头包含windows PE文件的主要信息,其中包括一个‘PE’字样的签名,PE文件头(IMAGE_FILE_HEADER)和PE可选头(IMAGE_OPTIONAL_HEADER32),头部的详细结构以及其具体意义在PE文件头文章中详细描述。
- 节表:是PE文件后续节的描述,windows根据节表的描述加载每个节。
- 节:每个节实际上是一个容器,可以包含代码、数据等等,每个节可以有独立的内存权限,比如代码节默认有读/执行权限,节的名字和数量可以自己定义,未必是上图中的三个。
(来源:http://blog.csdn.net/evileagle/article/details/11693499)
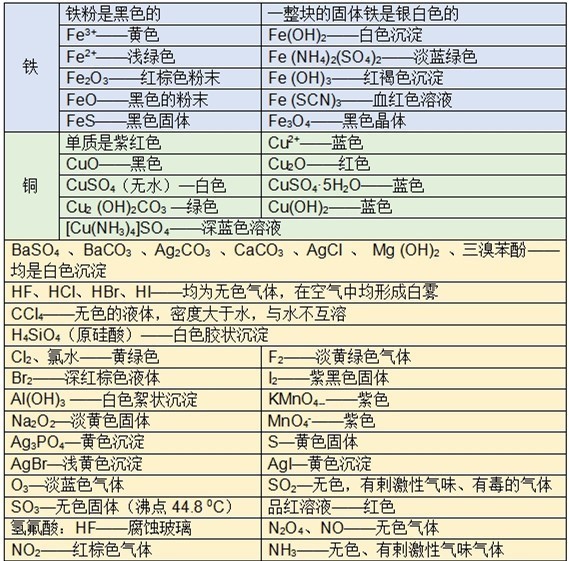
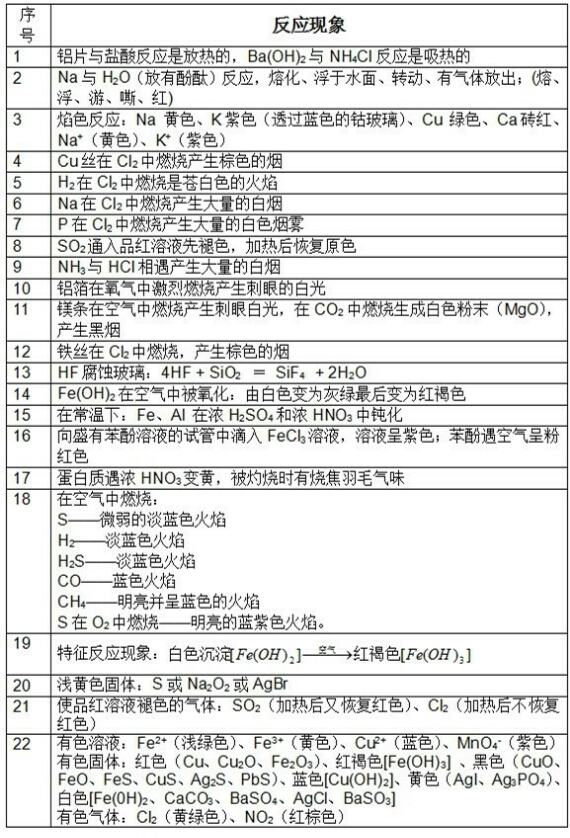
天呐没想到我化学这么渣的人居然报了个化学竞赛…而且好像再过三星期左右就要考了233…既然报了还是好好考下初赛吧233临阵磨个枪
2015年全国高中化学奥林匹克竞赛预赛试题
全国化学竞赛初赛讲义——晶体结构


